Tuesday, July 17, 2012

Anything Goes

What do you do with a leftover mistake?  A while back I had a matboard which I had slightly damaged and could not use for the original project.  I had the wild idea to spray it all over with some homemade color sprays and Perfect Pearl mists.  I thought it would make a good mat for a princess style She Art Canvas.  That never happened.


I cut the mat into smaller pieces and ran them through my Sizzix machine. I cut out three sizes of wonky hearts and then embossed them with a variety of patterns.  I added some additional touches with acrylic paint in purple, aqua and pale pink.  The purple was a metallic and I love the sheen it added to the matboard hearts.


The background of the tags are colored with Distress Inks, Stains, collaged bits of papers, stencils and stamps from Tim Holtz, Crafter's Workshop and more. I love the color combinations, the way I used lots of scraps from my craft table and how the wonky hearts look so great with the dry embossing. The hearts are all popped up
 with foam pop-its for a dimensional look.  Love them!

I am entering these into the Simon Says Stamp and Show Challenge this week. The challenge is to use any mediums to produce any project and that about covers this one. Thanks to the sponsors for the chance to win a gift certificate for more art supplies!

Gale C. Lewis


Masculine Tags


These altered tags are made with a set of paper dolls images I found online.  I manipulated and resized the images using my Silhouette Cameo machine, then printed and cut them.  I combined the elements to create several versions of the young man.

The backgrounds were created using a combination of dry embossing, stamping with paint and ink, stenciling with distress stains, etc.  The last two use some Tim Holtz Craft Resist paper and they all have some Distress Inks on them somewhere!

I made up sentiments and printed them on kraft cardstock.  I thought these young men should have classic names, timeless manners and be the epitome of gentlemenly youth.

Getting alot finished today!  These have been waiting for a while now.
Gale C. Lewis

Alcohol Ink Butterfly ATCs


Over at Frilly and Funky Challenge  Blog they are having an altered metal challenge. I think this tag will fit in nicely since I have altered the aluminum flashing tape by dry embossing it and coloring it with alcohol inks.  Stop by their blog and see the other projects submitted for this challenge.

These have been in the pile on my craft area waiting to be finished. I was inspired by the fantastic things that Tim Holtz creates using Alcohol Inks.  Little did I know how hard it would be to get a suitable result.  I did a lot of messing about with the materials and almost the whole time I thought, "These look like crap!"

However, these are good enough to share.  I found I got my best results as far as vibrant colors by applying the ink directly to the foil.  The background of these ATCs is chipboard covered in aluminum flashing tape, then embossed with various Texture Fade folders.  At first I tried pouncing the colors on using the felt and ink applicator, but the colors did not come out too well.  I worried about wasting
 the ink by dribbling it on the cards, but I figured it was also
wasting the ink to just let it sit in the craft drawer.

The butterflies were also cut from chipboard and then gessoed with white.  I did pounce the colors on with alcohol inks which also included some gold, copper and bronze fixatives.  I did finally get a finished color I enjoyed.

ATCs are Artist Trading Cards, small works of art that are 2.5 x 3.5 inches. 
Lots of people trade and collect these. They are the same size as baseball or
playing cards.  I will probably give these away.

Gale C. Lewis

Wednesday, July 11, 2012

Altered Wooden "Books"

I found a set of faux wooden books at a thrift store for whopping $1 for the whole set. They range in size from about 5 inches tall to about 2 inches tall. I have seen similar wooden books at the craft stores.
I started off by adding some black paint along the binding edge then covering the books with strips of dictionary paper and Tim Holtz Tissue Tape.  This is the first time I had really used the Tissue Tape for more than just a tiny accent and I was pleasantly surprised by how well it stuck to the wood. I Mod Podged over all that and let it dry.

I chose Conservatory paper by 7 Gypsies to cover the largest and third largest books. The edges were torn before being Mod Podged on and then I added lots of Distress inks and stains to grunge the books up. I wanted them to look as old and dingy as possible.

These two books are covered with torn images from the Steampunk Debutante 6 inch pad by Graphic 45. I did the same distressing as on the first pair. I finished them all off with a coating of Workable Fixative to seal in the Distress colors.  They are delightfully grunged up.


With this project I learned that you can take something practically worthless (ie, old thrift store craft junk) and transform it with lots of layers of paper, tape, inks and good old glue (Mod Podge.)  These will probably be adbandoned in sets of two. 
 I hope somebody enjoys them!

Gale C. Lewis

Monday, July 9, 2012

6 Inch Mixed Media Canvases

I want to start entering my work in challenges and so here is my entry for the Simon Says Stamp and Show Layers Challenge.  The challenge was to use layers, any kind of layers.  Here I have layered papers and colors to create the background for this mixed media collage. Then I added layers of stamps for added interest.

There are lots of nice projects featured on the Simon Says blog,
so head on over and check them out! They are even offering prizes
for the challenge winners.  Yay!

I used several different papers to layer all over the front and sides of the canvas, including part of the phone book, old dictionary pages and printed scrapbook papers. I applied watercolor washes over the papers in a sort of rainbow scheme.  I used Workable Fixative to seal the watercolor layer so it would not run when I added the bird cutout.  The stencil designs are from the Mixed Media stamp set by Tim Holtz.  I used some of my markers to add shadows and outlining around the bird.

Here is a detail shot of the chicken wire stamp by Tim Holtz. 
I used Staz-On black ink.

I covered this canvas with 7 Gypsies Conservatory paper which I then added color to with Distress and Pitt Markers.  The goldfinch cut out is Mod Podged on top and I added more color and outlines with markers.

I covered the front and sides of the canvas with four patterns of scrapbook paper. The flower petals are hand cut from dictionary paper and yellow scrapbook paper.  The center design was a detail on the sheet of scrapbook paper that I used for the petals. I colored over the dictionary pages using watercolor paint.  I added definition to the petals by tracing with black markers.


I finished up this flower canvas by stamping with a circle stamp around the flower and on the sides using Staz-On ink. I added color to the circles using Distress and American Craft markers.  I love the way the circles contrast with the geometric designs of the background papers. 

Using the 6x6 inch canvas is an interesting challenge. You do not have as much space to fill with design, but you are also limited by the size of the elements you want to add. I bought 8 of these at Walmart, so look for more to come.

Gale C. Lewis

Monday, July 2, 2012

Mixed Media Tags and ATCs


These three tags were created using some leftover backgrounds I had done with various techniques. From the left, dry embossing with Sizzix folder, tissue paper decopauge and ink, and dry embossing with heat embossing over it and then additional stamping over all.  The images are all found as free collage art on Flickr. I printed them out and cut them using my Silhouette Cameo machine.

I used markers, glitter glue and lots of colors of Distress inks to color the "joins" where the images are glued to the background.  I am so pleased how pretty these turned out!

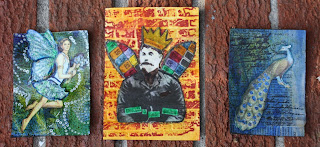
These are ATC sized, cut from watercolor paper over which I had decopauged many layers of papers, paints and sprays to created the backgrounds.  I added the printed images and then embellished around them to tie them into the background. The fairy was a paper doll, her outfit is glued over her body.


This is an example of the first dozen ATCs I made.  I used photos cut from a discarded book, crowns cut from Aluminum tape, alcohol inks, glitter glue and Distress inks.  I added funny captions with Glossy Accents.  I don't like how these came out so much, but it was an experiment to see if I liked making smaller art projects to abandon.

Well, gotta get ready to teach summer school. No more time for blogging today!
Gale C. Lewis

Tuesday, June 19, 2012

Lots of Birds, Lots of Art!


I painted over a canvas board I made a few weeks ago because the color combinations did not thrill me. I used many shades of blue and just sort of splooged them on.  I got some soft body Liquitex acrylic paint on sale at Michaels. That stuff stays wet for a long time and goes very far when painting with it.  Love it!

I cut a stencil using my Silhouette Cameo and an online image of a bird perched on a barbed wire fence.  I am stuck with what to do next with this picture. I might just leave it simple.


 This 4 x 6 canvas was a yard sale find. It had a cow and the word "Milk" painted on it. I gessoed over it and then used multiple shades of blue to create the background.  The heart is many layers of pink and red tissue paper, then it is painted over with some magenta acrylic.  The birds were an image I found online, printed and cut out with the Cameo.  I painted and colored over the birds with markers and paint. The swirls are stamped with the magenta paint.  I am still thinking about what words I want to add to this canvas.
The swallow is cut from atlas paper and decopauged onto the background. I used a Tim Holtz mask for the compass. The circles are a stamp with acrylic paint and I also used a splatter stamp with pigment ink.  The heart is many layers of tissue paper applied with Mod Podge.  I am going to add the text, "Follow your heart!"

These lovebirds were created on an 8x10 canvas board. It includes many of the elements from the other canvases. I added text stamping with white pigment ink.  None of these are completely done yet, but I wanted to share them.  I am really happy with my results so far.

It occurs to me that maybe everybody does not work on multiple canvases at one time. It is just easier for me to lay out three canvas boards and work on backgrounds at the same time especially since you have to wait for layers to dry before adding on.  I saw several bird art projects others had completed and wanted to try making my own versions. They all just seemed to come together naturally.  It helps me decide what to do next when I can lay down one canvas and pick up another one for a few minutes of futsing around with art materials.

Happy Crafting!
Gale

Sunday, June 17, 2012

Art Abandonment

This guy, Michael deMeng, hosts a group on Facebook called Art Abandonment.  The idea is to take some of your arty creations and leave them in a public place for someone to find and keep (and hopefully enjoy!) Since I have a lot of things I make and stash, I thought this would be a good activity for me.

I pulled out some altered tags I made and added a little message to the back of each. I left them scattered around the Charlottesville-Albermarle Airport when I was there yesterday returning the rental car. I also left one inside a magazine at the vet's office where Kippy boarded while we were on vacation. I have no pictures of these, though.

Yesterday I made some flower brooches using a quilted pillow sham and the Tattered Florals die from Tim Holtz. I also designed a cool card background to let people know that they have found a free gift. I designed and cut the cards from cardstock using my Silhouette Cameo machine and the design software that came with it.


The quilted pillow sham came from an old yard sale purchase. I use the quilt all the time, but never the shams. So I got the wild idea that I could cut it up and make some nice flowers.  I used my Crop-o-dile to cut a hole in the center of each and attached the layers with a brad. The back are finished with some sticky craft felt onto which I sewed the pin back into the center.

I finished up the pins this morning and attached them to the cards. They are ready to distribute! I hope the finders will enjoy them.

Happy Crafting!
Gale C. Lewis

Tuesday, May 29, 2012

Layers and Layers and Layers


From one of my online buddies, Barb, I found out about these cool digital frame effects that can transform your photos with just a few clicks of the mouse. The site is http://pixlr.com/express/  and it has many different textures you can add to your pictures. I have always wondered how Tim Holtz and others have made these grungy looking edges to their photos. I cannot afford Photoshop and this is a free alternative. Check it out!


 These She Art canvases are not projects that are quick finishes for me. I look at them and think, "Let me add one more layer of texture, stamps, paint or something." Then another layer and more staring at the canvas to see what else is missing.
I have a set of about 8 Tim Holtz Distress Markers and the other day I bought some additional markers at Michaels called Stamp Markers by American Crafts. The interesting thing about them is they look exactly like the TH markers, except for the text on the barrels of the markers. I am sure they are not the same formula of ink inside. I was looking for some more Distress Markers at the big box store, but they did not have any. I am getting hooked on being able to use a brush end marker to add details and additional color to my canvases. I even got some workable fixative spray so that I can seal the markers before adding more Mod Podge.
 This canvas features a dress made with layers of patterned scrapbook paper and highlighted with red acrylic paint. The flowers are paper ones that I Mod Podged down and then went over with some more paint and markers. I also used some old reading flash cards that were destined for the trash bin.


Here is the final version of this canvas. I redid the hairdo, added butterflies and hand wrote the sentiment, "Take wing and fly." It has so many layers of paper, paint and marker I cannot even count them.  I wish I had not hand written the words on it. I am never satisfied with my handwriting and once it's on there it's on for good.

Summer has finally started for me and I look forward to a long string of days in which my time is my own with no alarm clock ringing at 5 a.m. 
Happy Crafting!

Gale C. Lewis

Sunday, May 20, 2012

More She Art

I am still working through the She Art class videos at my own pace, making canvases as I go along.  The good thing about this class is you have access to the materials online for a year, so no deadline pressures.  (Lord knows, I have enough pressure with the high stakes testing taking place at my school these past few weeks.)


Here are two stages of a canvas that I have done some repairs on. I originally gave the girl a very unfortunate large blond bushy hairdo. It was kind of like Rosanne-Rosanna-Danna, only yellow. So this morning, I got out my exacto knife and cut several layers away from around her head to rid myself of the offending hairdo.  I like these braids much better.

I got some rubbery shelf liner and a mesh placemat at the Dollar Tree this week and have used both of them here to add texture.  I plan to add lots of paper butterflies to this canvas and some sort of sentiment to go with them.

I did this canvas this weekend. Can you tell these are hollyhocks?  I am really pleased how this one came out. I did use my Silhouette machine to cut the dress and body parts. I just cannot cut this well by hand.


Tonight I started some new backgrounds. This is the step that seems to take the longest for me because you have to get it done before you can work on your next girl. There are lots of different materials here: origami papers, book paper, tissue paper, acrylic paints, Adirondack Colorwash Sprays, Mod Podge, an aluminum grill pan (as a template for the dots.) 

I wonder how many more layers these will take on before they are ready for the next girl I design? Well those butterflies are not cutting themselves. I am not cutting them using the Silhouette machine because I forgot to add registration marks when I printed it. Now it has to be cut by hand or wasted. I am too stingy with my printer ink to waste them, so hand cutting it will be.  Blurrrrggg!

One week then a few weeks of freedom before summer session!

Happy crafting!

Gale C. Lewis


Thursday, May 10, 2012

Cute Goat Girl

 Still working on my She Art class by Christy Tomlinson and I have veered from the directions (as usual) to make it my own.  She does not tell how to make mermaids and goat girls, but I am using her directions and adapting them to my ideas.

This canvas started with a picture from an animal magazine of this little goat (or deer maybe) with the largest eyes and longest eyelashes. I knew right away that I wanted to make her into a girl.

This week in the class I am learning about how to make the dresses more detailed and interesting. I used strips of the blue paper to make the dress look pleated. I added a belt and then embellished the dress with scraps of lace. The hairbow is made from the same paper as the dress.

The background of this 5x7 foam core board was made with tissue paper over which I glued strips of blue and green papers. I added some green glitter glue and blue paint. Once all that was dry, I stamped on the rectangles and the circle using acrylic paint and old wooden blocks.

For the sentiment, I used my Tim Holtz Chitchat stickers and doodled around them with a black Sharpie. Let me tell you, doodling over dried glitter glue is not easy.

One of the hardest things for me about this class is adding the doodles and embellishments and not worrying if they do not look perfect. I am not skilled at sketching and I know that shows in my doodling.

I have already given this one away to my friend Heather.

I am only halfway through the Week 2 videos and there is still another week to go after that.  I am learning so much!

Happy Crafting!

Gale C. Lewis


Tuesday, May 8, 2012

She Reached for the Stars Canvas

 This is the first She Art Canvas with lots of doodling and other details added. I used some Distress Markers on the sunburst and to outline the words below.
 I thought this was an appropriate sentiment for my first She Art canvas. I am trying out an online art class and this is the first girl for me. 
 My new 8x10 canvas-- in love with it.  I used green and blue tissue paper for the background and inked over it with Distress Ink pads. The body and dress were cut on my Silhouette Cameo from various papers, including dictionary paper. I painted over the dress and then colored on some designs with Distress Markers.  I got the idea to have her reaching above her for the stars. The stars were painted with a template cut from cardstock in both purple and yellow. Then I traced them in black Sharpie to help define the shape.

The trickiest part here was deciding how to paint just the back of her head. I think I still need to add a layer of paint around the neckline.  I love the shape of this dress way more than the boxy dress I made on the first canvas. It was astoundingly easy to cut from a paper doll template!
 I stamped the bird with Staz-on ink and then added doodles such as the music notes and squiggles with my Sharpie. See the border along the edge of her dress?  I love how that turned out.
Here is the big lug-- Kippy. He was intently watching me take photos of the artwork, and I could not resist taking a few of him. Of course, he would not keep still, so his picture is off center.

Here's to trying something new and reaching for the stars!
Gale C. Lewis