Monday, July 27, 2009

Wholecloth Quilt

I could not sleep the other night and got up to change my pillow case for a fresh dry one. While I was rooting around in the linen closet, I came across a piece of barkcloth home decorator fabric that was stashed in there. It was a large sample piece that came from a local outlet. It was in the linen closet because I had thought it might make be a good pillowcase one day.


Needless to say, the moment I saw it again, I thought that it would make a lovely quilt. I used blue fabric from a vintage sheet to border the center panel. Additional fabric in beige tones was used for the backing and binding. I used a denim blue thread for stipple quilting the borders. The center panel was also stippled, using thread of a greenish blue shade.

When I showed this to my sister yesterday, she took it from my hands, examined it carefully and said, "Thank you!" I guess that means she likes it! She did have to give it back to me so I could wash/dry it. She will get it back soon.

Neptune Quilt Finished!


This is the Disappearing Nine Patch lap quilt made using the Neptune line of fabrics by Tula Pink. This project used 2 charm packs, 1 yard of dark blue/algae damask fabric and 2 yards of the fish scale pattern for the backing and binding. This is when I started this quilt.

Here is the finished quilt posing in an old wicker chair. This chair sits on my porch and holds a big dish of birdseed in the winter. Other summers I have used it to hold a huge Boston Fern. I got this chair from my maternal grandparents' estate after their deaths. It is too rickety to sit in, but I am keeping it.

Here is a detail of the backing and the stippling free motion quilting. I used several different colors of threads on the top when quilting to accent the shades in the blocks. The bobbin thread was a pale pink that blended well with the fish scale fabric.
If you click on this picture you should be able to see the details of the stippling. I do not prewash fabrics before quilting unless they are from reclaimed bedding or garments. If it is designer fabric off the bolt, I do not prewash. I like the way the quilts turn out when you wash them after the quilting and binding. The cotton batting and cotton fabrics shrink up just a bit in the washer/dryer and give the finished product such a nice texture.
Love this, wonky corner block and all. Keeping it for myself.


Newly Finished Quilts

This quilt was completed from start to finish on Sunday after my nap. I found the center panel in the dish towel bin at the Goodwill. It was wrinkled and in need of a wash and an iron, but I loved the colors of the screen printed design. The towel is 100 percent cotton. I used 5 inch borders of a bright, swirly, yellow fabric from Joann's. I quilted the center panel outlining all the squares in bright yellow thread. The yellow borders were stippled with free motion quilting using my Brother sewing machine.


Here is a detail of the backing fabric. It has a story. I noticed that there was an artist's signature in the design hidden among these abstract and brightly colored fishes. They remind me of guppies. The signature is Ken Done (rhymes with Cone). I had never heard of him before so I did a Google Search. Turns out he is a pretty famous artist in Australia who designs clothing and accessories as well as paints bright scenes of his homeland.

This fabric came from a vintage (80's) custom designed bedding set that I found at an estate sale. There was a duvet cover, large valance curtain panels and a couple of pillow shams. I washed them, took them apart at the seams and ended up with good amount of yardage of home decorator cotton.

Last night when I was pulling out pieces to choose a backing for this cheerful doll quilt I first noticed that some of the fabric was "signed." Just a bit of fabric trivia. If I were a painter I could design fabric too.

This quilt is going to a little girl relative who is visiting her grandparents this week.

Finished and Ready to be Labeled

Last night I finished up the binding on a couple of lap quilts. This morning I ran them through the washer and dryer to get that crinkly goodness that comes when the fabric and batting shrink up after the quilting is done. They turned out great!

I designed and printed some labels on a cotton fabric that goes through the printer. Here is the pile of quilts ready to have the labels sewn on.

Looks like somebody wanted to inspect the freshly washed and still warm from the dryer quilts for himself. Good help is so hard to find!

Tuesday, July 21, 2009

Sound of Music Video from Youtube

Pet Nap Mats


I love pillow shams. I acknowledge that they are at best decorative and mostly useless. That does not stop me from loving them. Whenever I see pretty pillow shams at thrift stores I buy them. Needless to say, I have more pillow shams than any one person would normally need. Then I had a brain flash!
I need to practice my quilting techniques and I don't want to do that on something that I have spent hours piecing together. Free motion quilting is tricky for me still and I do not want to risk ruining a quilt top while working on my skills. I decided to use the pillow shams as practice projects with a purpose.
I make pet nap mats from them!

I measure the opening that would take a pillow to see how much quilt batting to cut. I use pretty thin batting, Warm and Natural brand, so I use 2 layers of batting. I insert the batting inside the sham and pin the flap shut so that it will lie flat as I am quilting. I am careful to not run over those pins with my sewing machine. That can cause damage to the machine or myself.
Then I flip the sham over and start quilting on the front. Depending on the pattern of the sham, I may do free motion stippling as is shown in the purple plaid mat. I may stitch along the seam lines if the sham has a pieced front as is shown in the blue and yellow mat.
When the stitching is finished I have a nice nap mat for a cat or dog. I have an older cat who cannot groom himself as well as he used to. These mats protect my furniture from his accidental messes. The mats can be used in the car, in your pet's sleeping crate, at the foot of your bed in your pet's favorite lounging spot or as a security blanket when you need to board your pet at a kennel.

If you do not like the idea of using pillow shams from thrift stores, you could purchase shams at your local discount department store. They come in many patterns and colors and you are sure to find some to match your home decor. If your dog is larger than medium sized, you can use pillow shams meant for king sized pillows.

They are easily cleaned in the washer and dryer.

Let me know if you try this idea. I am thinking this will make a good present for my pet loving friends.


Comfy Conner?


This is how I found Conner when I came into the bedroom this morning. Yes, he is resting his body on one pillow and his chin on another. It's a dog's life, isn't it? I laughed and headed for the camera.


Monday, July 20, 2009

More From SwapBot

Here is Conner posing with the treats that came from imakebelieve on swapbot. It was the Souvenir, Postcard and Candy Swap. She sent a great package from Florida including saltwater taffy, shells, sand from her local beach, an orange spigot, gumballs and postcards. This nice lady has pet schnauzer, too, which is why Conner is grudgingly posing.

Here is the fabric panel and a swatch of extra cute mouse fabric that came from Michele360. The fabric panel is to make a pig doll. I have a recipient in mind for this already!
Thanks, Ladies! I am loving Swapbot. Check it out!


Sunday, July 19, 2009

What Can You Make with a Cloth Diaper?


I whipped these up last night using the Burp Cloths Tutorial here. I used two different patterns of flannel in girly butterfly prints. I cut the fabric 6 inches wide and as long as the cloth diaper. I folded over the side seams and zig-zagged with white thread. The ends I did not fold over, but zig-zagged on the raw edge.
These are for a coworker who is due to have a baby girl later this summer. I hope she likes them! I think they turned out great, so soft and absorbent.

Saturday, July 18, 2009

Doll Quilt Swap

I have signed up for a doll quilt swap on Flickr. Go here if you want to see some of the beautiful small quilts that people have made and swapped in the past.

No, I don't play with dolls, nor do I have a girl child to supply with doll quilts. Neither do most of the people who do these quilts. Doll quilts are small, can be finished much more easily and quickly than bed sized quilts and offer their makers chances to try out new techniques on a small scale. They also look great as wall art!

I have made a couple of practice quilts to get ready for the swap. Here they are.


The first is the leftover block from the pieces of eight quilt. Since taking this photo I have completed this block with a binding that is the same as the backing fabric.

The last two photos show a disappearing 9 patch quilt. It is about 23 inches square. These three different fabrics are all blocks cut from vintage sheets. I got these on Etsy from a lady that sells an assortment of fatquarters, 6 inch and 12 inch pre-cut blocks from vintage sheets. I got some wonderful squares, ready to sew with.

I quilted the three layer sandwich with red, white and blue thread in wonky diagonal lines. The center photo shows what it looked like after quilting, but before trimming and binding. I have to say that one of the attractions of doing the doll quilts is that they are easy to maneuver under the machine when you are quilting.

Wednesday, July 15, 2009

Pieces of Eight


I am calling this quilt "Pieces of Eight." It is a Chinese Coin Quilt with the "coins" grouped in eights. Then I added 5 inch borders all the way around. The name is inspired by my current infatuation with Pirates (I mean the pirates of old--not nasty machine gun toting pirates of today.)
I used the quilt as you go method for this quilt to see if I could do a better job with the machine quilting with less bulk under the harp of the sewing machine. Using a high contrast pink thread for the quilting allowed me to see how my stippling design was turning out. I experimented with different types of swirls and whorls. The eight pieces in the center of each block were done separately to help them stand out in the design.
So, usually the quilt as you go method calls for you to sew the quilted blocks together with the seam revealed to the backing. Then the seams on the back are trimmed and covered to hide them. However, I chose to have the seams revealed to the front because I like the smooth feel of a backing with no extra bumps or seams. I will have my work cut out for me to conceal the seams from the front without botching the design of the quilt. Right now I am trying to decide if I should use more of the white on white fabric that surrounds each group of eight coins or if I should use some hot pink for both the center seams and the binding. I am leaning toward the hot pink.
The backing for this quilt is a vintage sheet from a thrift store. I chose it both for its incredible softness and also for its busy design. Busy designs are more forgiving when being cut up and pieced back together.
Here's the math: I used a Tula Pink Nest Jelly Roll and cut 2 five inch pieces off each of the 40 strips. That made 80 2.5 x 5 inch rectangles. When I pieced 8 of them together that made 10 blocks. As you can see from the pictures, this lap sized quilt only uses 9 completed blocks.
What happened to the tenth block, you ask? It will be finished by itself and probably sent off to a swap partner in a small quilt swap on SwapBot.
More on this project when it is finished!

Swap Bot Goodies!

I am participating in mail swaps using a website called SwapBot. So far I have gotten some cute postcards and sent out some postcards to other participants. Today I got my first "package" swap-- it is from a swap called "We Love Office Supplies." And those who know me know how true that is! Look how cute this package was--
My swap partner even included an extra gift of scented soap and licorice candies from Chinatown. I especially love the bird notebook which is going in my purse. Now I won't have to write my shopping list on the back of an old receipt.

Tuesday, July 7, 2009

Wool Applique Art


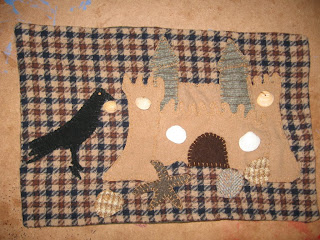
This is a wool applique project inspired by my recent trip to the beach. It is a crow standing near a sandcastle. I used upcycled wool garments as the source for my felted wool.

Recently I began to use wax paper to help me transfer designs for cutting. I traced the shapes onto the wax paper and then ironed it onto the wool fabrics I had chosen for this design. I even embroidered over the paper for the wool shells so that I could get the swirl design right. Once I finished the embroidery I tore off the paper. I was surprised at how easy it was.


I started this cat before vacation and this is how far I got before I abandoned it (temporarily.) I used wax paper to transfer this design from a quilting magazine my aunt loaned me. The problems started with embroidering the toes. I tried to free hand them several times and they looked like cr**! I picked them out over and over again then tried to mark the lines with a chalk pencil. Well, chalk pencil does not stick to a felted sweater! AAAARRRGGGHHH! I muddled through the toes and then quit.
I got the idea to retrace the face on some fresh wax paper and soon I will iron it onto the wool. Then I will embroider the face through the paper, tear the paper away and reveal a perfect cat face! I love the eyes on this cat.
I am planning to make another one with gray and black wool. I love these sly looking kitties! I am thinking one for my vet, one for my uncle, one for . . . .

Sunday, July 5, 2009

Back Home!

We are back home from the beach. We drove up to Virginia Beach from Hatteras Village on Saturday to spend the 4th of July. We got a hotel room in which the dogs relaxed while we went out on a fireworks cruise out of Lynnehaven Marina. We saw and chatted with a young man whom we met last year at the same cruise. He was and still is one of the mates on the boat, working for tips. He revealed that he plans to join the Coast Guard, but that working on a fishing boat has been his dream job since he was a little kid.


We drove back today and about an hour out of Virginia Beach it started raining. It was the first rain for the whole week with the exception of a small shower one night while we were sleeping. The luggage bags on the roof made the windows leak and the inside of the car is damp. There are also 2 very wet luggage bags that will need dealing with tomorrow.


It was a great vacation and those cabanas are so cute it would be nice to buy one, if only the drive there was not so long.


Waiting for me in my mailbox were four pieces of fabric I ordered while on vacation--two pieces of Tula Pink's Perched fabric from the Nest collection and 2 other pieces of fabric for a present for my mother. I may have time to take out the sewing machine tomorrow, if I get enough vacation clean up done.


Thursday, July 2, 2009

Pirates!

Blackbeard's Final Battle
Blackbeard


The OBX was the setting for a good deal of piracy back in the day. Here are some pirate images and links to pirate lore.